

Introduction
If you ever worked on a mobile app and wondered “Would someone using TalkBack be able to use this?”, you’re not alone. Accessibility is one of those things we all know we should care about, but often don’t know where to start. Luckily, Android gives us a really simple and surprisingly powerful tool: Accessibility Scanner.
It’s a free app made by Google that you can install just like any other app from the Play Store. Once it’s on, it lets you scan any screen on your device and tells you what could be better. Maybe the contrast is too low. Maybe the tap targets are too small. Or maybe some elements are missing content descriptions. You don’t need to be an accessibility expert to get started. Just open the app, scan the screen, and you’ll get clear, actionable suggestions.
What I like about it is that it doesn’t feel like a heavy tool meant only for developers. It’s perfect for testers, designers, and anyone who just wants to make apps a little more usable for everyone.
Why it matters now more than ever
Since June 28, 2025, accessibility is no longer just a “nice to have” in the EU. The European Accessibility Act (EEA) now requires that many digital products and services, including mobile apps are accessible to people with disabilities. That means businesses, developers, and testers need to start taking accessibility seriously. Accessibility Scanner is a great first step toward making your Android app compliant without overcomplicating things.
How to install and use Accessibility Scanner
Getting started with Accessibility Scanner is super easy, no coding, no setup, just a few taps.
1. Install the app
Go to the Google Play Store, search for Accessibility Scanner, and install it like any other app. It’s made by Google, so you can trust it’s safe and well maintained.
Direct link (if you’re on mobile): Accessibility Scanner on Google Play
2. Enable the permissions
After installation, you won’t be able to use the app until you enable the necessary accessibility settings. Here’s how:
- Open the Accessibility Scanner app
- It will prompt you to go to Accessibility settings
- In the settings, look for Installed apps or Downloaded services
- Tap on Accessibility Scanner
- Enable the service using the toggle
- Confirm when the system asks for permission
This gives the app access to scan your screen and analyze elements — don’t worry, it doesn’t collect personal data or interact with apps without your action.
3. Start scanning
Once the scanner is active, you’ll see a floating blue button on the side of your screen. That’s the scanner button.
Here’s what to do next:
- Open any app or screen you want to test
- Tap the Accessibility Scanner button
- The screen will freeze for a second while it analyzes everything
- A report will appear, showing:
- What could be improved (e.g. small tap targets, low contrast)
- Which elements are affected
- Suggestions for fixing them
How to read the Accessibility Scanner report
Once you scan a screen, Accessibility Scanner shows you a report. It may look a bit technical at first, but don’t worry, it’s actually easy to understand once you know what to look for.
Here’s how to read it:
1. Overview of suggestions
At the top of the report, you’ll see the number of suggestions found. Each one is grouped by type of issue, like:
- Touch target size — buttons or clickable elements that are too small
- Text contrast — text that’s hard to read because of low contrast
- Item label — missing content descriptions, which are important for screen readers
- Clickable item not labeled — interactive elements that don’t have proper labels
These categories are color-coded to help you quickly spot more serious issues.
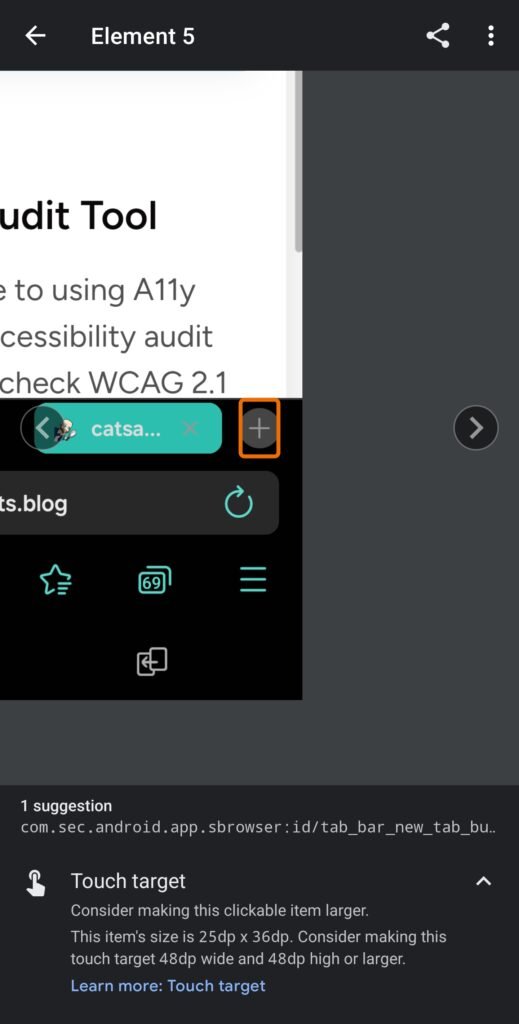
2. Highlighted elements
Each issue is visually highlighted on the screenshot of the screen you just scanned. You’ll see yellow or orange boxes around problem areas, with a number linking them to the suggestion below.
This makes it super easy to understand where the issue is and what element it refers to, no guessing or digging into code.
3. Details and recommendations
One of the most helpful features of Accessibility Scanner is that you don’t need to guess what the warnings mean or how to fix them.
For every issue in the report, there’s a small “Learn more” link. When you tap it, the app opens a detailed explanation straight from Google’s accessibility guidelines. You’ll find:
- What the problem actually is (in plain language)
- Why it matters for users with disabilities
- How you can fix it in your layout or code
- What best practices to follow (including links to WCAG standards)
This makes it super easy to learn as you go — especially if you’re still getting familiar with accessibility. You don’t need to Google every term or search Stack Overflow for fixes. The Scanner acts almost like a mini-accessibility coach built into your device.
Whether you’re a developer, tester, or designer, the “Learn more” button can turn a technical warning into something actionable and understandable.
Below are screenshots regarding the ‘Learn more’ option


4. Export or share the results
You can tap the share icon to export the report as a screenshot with suggestions, or as structured text. That’s great if you’re adding tickets to a bug tracker like Jira, or sharing results with devs or designers.
Accessibility Scanner is helpful, but not enough
As useful as Accessibility Scanner is, it’s important to remember one thing: no automated tool can catch everything. This app is a great starting point, especially if accessibility is new to you — but it only scratches the surface.
Some of the most important accessibility issues can only be found through manual testing. Here’s what I mean:
1. Use a screen reader
If your app should work for blind or low-vision users, open TalkBack (on Android) or VoiceOver (on iOS) and try to use your app with it. It’s the best way to experience what screen reader users go through.
Ask yourself:
- Can I understand what each button does?
- Is the focus moving logically between elements?
- Are announcements clear and helpful?
You’ll be surprised how many things can “look fine” in code but make no sense when read aloud.
2. Test with a keyboard
Keyboard navigation isn’t just for desktop apps. People with motor impairments may use keyboards, external switches, or assistive tech to navigate mobile devices.
Try this:
- Connect a physical keyboard (or use an emulator)
- Navigate through your app using Tab, Shift+Tab, and Enter
- Make sure all interactive elements are reachable and usable
If something can’t be reached without touch — it’s not fully accessible.
3. Think about real users
Accessibility is about people, not just checklists. The best results come when you combine:
- Automated scans like Accessibility Scanner
- Manual checks using assistive tools
- Feedback from real users, when possible
In other words: Accessibility Scanner is a great tool, but it won’t replace empathy, common sense, and real testing.
Final thoughts
Accessibility Scanner is one of those tools that feels almost too simple for how helpful it can be. You install it, scan the screen, and right away you get clear suggestions on what could be better. No complicated setup, no coding, just action.
But let’s be real for a second. Accessibility isn’t something you fix once and forget. A good app should be usable by everyone, including people who navigate with screen readers or external keyboards. To achieve that, you need real testing. Try turning on TalkBack, checking focus order, using only a keyboard, and seeing how your app actually behaves.
Accessibility Scanner won’t catch everything. But it gives you a head start, especially when you’re new to accessibility or short on time. The best part? You can tap “Learn more” on each issue and get practical advice on what to change and why it matters.
If you haven’t tried it yet, now’s the time. Install it, scan a screen from your app, and see what comes up. You might be surprised how much you learn from those small suggestions.