

Accessibility is no longer just a “nice to have” feature. With the European Accessibility Act coming into effect in June 2025, making sure websites are accessible is becoming an actual requirement. This is exactly why I built A11y Audit Tool — a simple and practical solution for running accessibility audits directly from your browser: https://www.a11y-audit.eu/
Why I built A11y Audit Tool
When I built A11y Audit Tool, my main goal was to make accessibility audits as simple and approachable as possible. I know how technical this topic can get, and I wanted to create something useful for both developers and non-technical users. In this post, I’ll walk you through how to use the tool — step by step, without too much jargon.
Easy to use: no installation required
The tool is available directly in your browser — you don’t need to install anything. Just head over to A11y Audit and you can start testing right away.
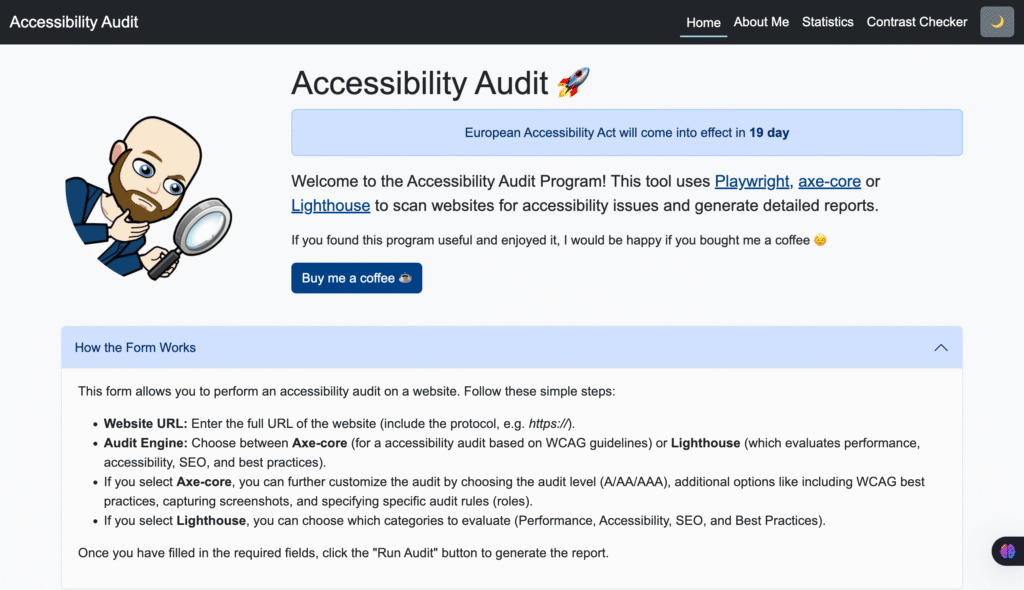
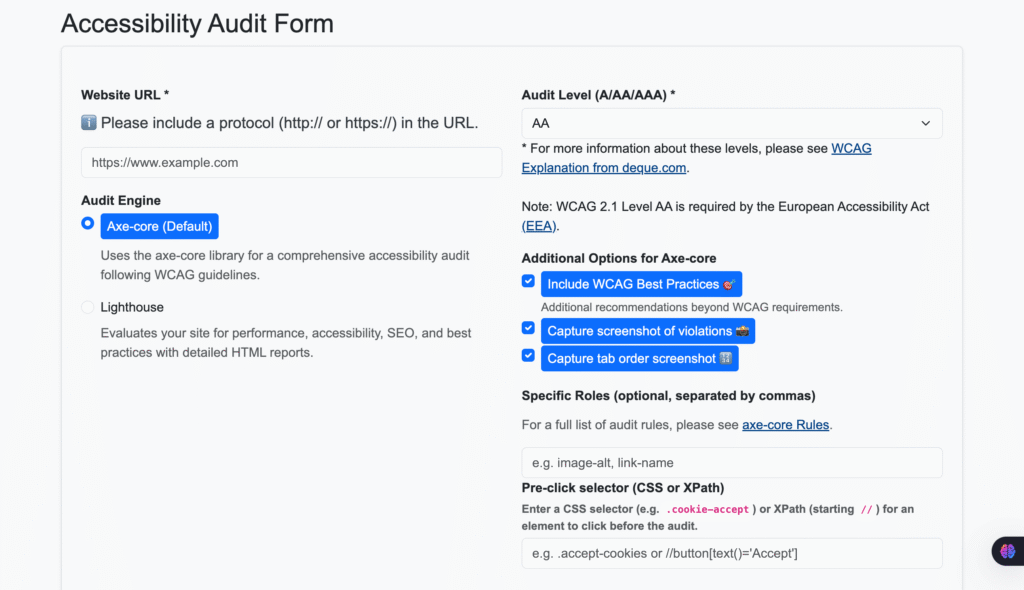
The first thing you’ll see is a simple form. You just need to enter the full website address you want to test. Make sure to include https:// or http:// — the tool will check if your URL format is correct automatically.
Axe-Core
Then you select which engine you want to use for the audit.
By default, the tool uses Axe-core, which is a widely recognized accessibility testing engine developed by Deque Systems. It focuses purely on accessibility and checks your website against the WCAG 2.1 standards, detecting many of the most common accessibility issues automatically and providing actionable recommendations. Axe-core is often used in professional accessibility workflows and integrates well with both manual and automated testing processes.
Understanding WCAG and conformance levels
The audits performed by A11y Audit Tool are based on the Web Content Accessibility Guidelines (WCAG) — a globally recognized standard for web accessibility. WCAG provides a set of technical and design recommendations to ensure that websites are usable for people with different types of disabilities, including visual, auditory, motor, and cognitive impairments.
The guidelines are organized into three conformance levels:
- Level A: The minimum level — addresses the most basic accessibility barriers.
- Level AA: The recommended standard for most websites — covers a broader range of accessibility issues and is often required by law or organizational policies.
- Level AAA: The highest level — includes additional requirements to improve accessibility even further, but can be very difficult to fully achieve on most websites.
In A11y Audit Tool, you can select which WCAG level you want the audit to target, depending on your project’s goals, legal requirements, or internal accessibility policies.
If you stay with Axe-core (which most people do), you have a few extra options to customize the audit. You can select the WCAG conformance level (A, AA, or AAA), include best practices, capture screenshots of violations, or even generate a visual representation of the tab order. For more advanced users, there’s also the option to specify particular audit rules you want to focus on.
Screenshots and tab order mapping
One feature that I personally find especially helpful — and where I believe A11y Audit Tool stands out compared to many other solutions — is the ability to automatically capture screenshots of detected violations and generate a visual representation of the tab order.
When Axe-core identifies accessibility issues during the audit, the tool can take screenshots that highlight the exact element on the page where the problem was found. This makes it much easier for both developers and testers to quickly understand where the issue occurs without needing to inspect the raw code.
In addition to this, A11y Audit Tool can automatically create a tab order visualization. This feature captures how keyboard navigation flows through the interactive elements on the page, allowing you to spot potential focus order problems at a glance. While tab order issues are critical for keyboard and assistive technology users, they are often harder to catch in purely code-based audits — the visual map provides immediate clarity.
In my experience, this level of fully automated visual reporting is something I haven’t seen widely implemented in other accessibility auditing tools. Most solutions provide lists of violations and code snippets, but very few offer this type of combined, automated visual output that simplifies debugging and significantly speeds up the remediation process.
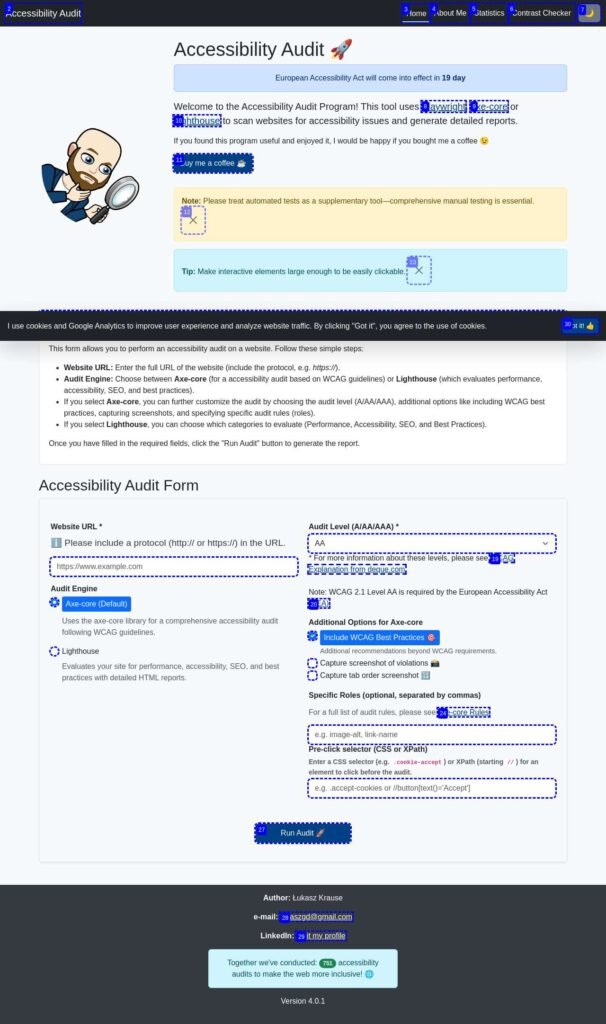
Pre-click selector
One feature I personally find super helpful is the ability to define a pre-click selector. Many websites today load cookie banners, modals, or overlays that block the content before you can even start auditing. With this option, you can tell the tool to automatically click on a specific button or element before the audit begins. You simply enter a CSS selector or XPath, and the tool handles it for you.
Lighthouse
If you want a broader website review that covers not only accessibility but also aspects like SEO optimization, page performance, and general best practices, you can choose Lighthouse. Lighthouse is an open-source tool developed by Google, commonly used in web development to analyze the overall health of a website, helping developers improve user experience, speed, and discoverability alongside accessibility compliance.
If you pick Lighthouse instead, you can select which categories you want to include in the scan — accessibility, SEO, performance, or best practices — depending on what you’re currently working on.
To be clear: no automated tool will ever fully replace proper manual accessibility testing. But tools like this can save a huge amount of time — especially during development, in early QA phases, or for quick compliance checks. That’s exactly why I built A11y Audit: to make accessibility a bit easier for everyone.
Understanding the reports and fixing issues
axe-core
Once everything is set up, just click Run Audit. After a short moment, you’ll get a full report with the results: the issues found, their severity levels, WCAG references, and screenshots if you’ve enabled them.
Let’s talk briefly about how to read the reports and approach fixing what the tool finds.
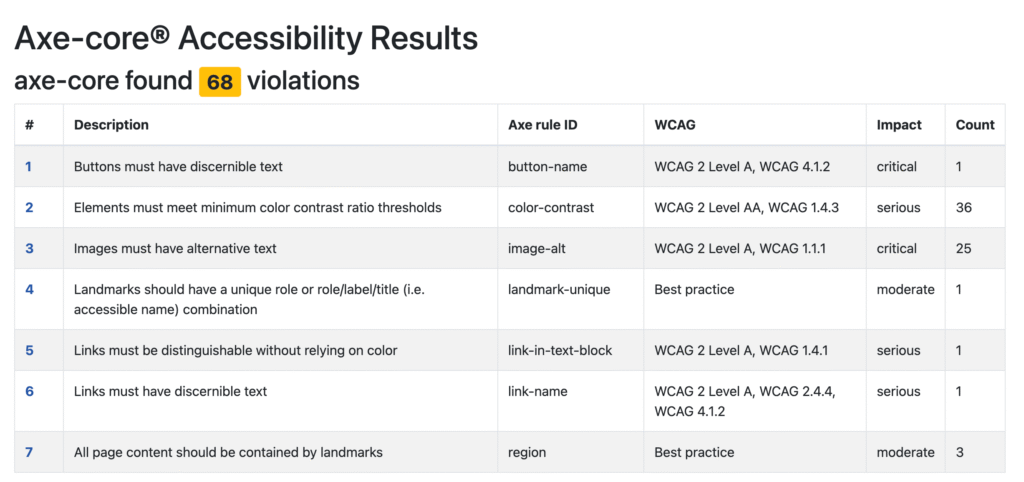
After running an audit with Axe-core, the tool generates a summary table listing all detected accessibility violations. Each issue includes:
- Description — a short explanation of the problem (e.g. “Images must have alternative text”).
- Axe rule ID — the internal rule identifier used by Axe-core (e.g. “image-alt”, “color-contrast”).
- WCAG reference — the corresponding WCAG 2.1 guideline(s) that are being violated.
- Impact — the severity level of the issue (critical, serious, moderate, minor).
- Count — how many times this issue was found on the page.
This overview helps prioritize which problems to fix first and gives clear guidance on the scope and nature of the detected accessibility issues.
In Axe-core reports, each issue comes with a short description of the problem, a severity level, a reference to the specific WCAG rule being violated, and a suggestion on how to fix it. You’ll also get a snippet of the HTML code where the problem was found, making it easier to locate and address the issue.
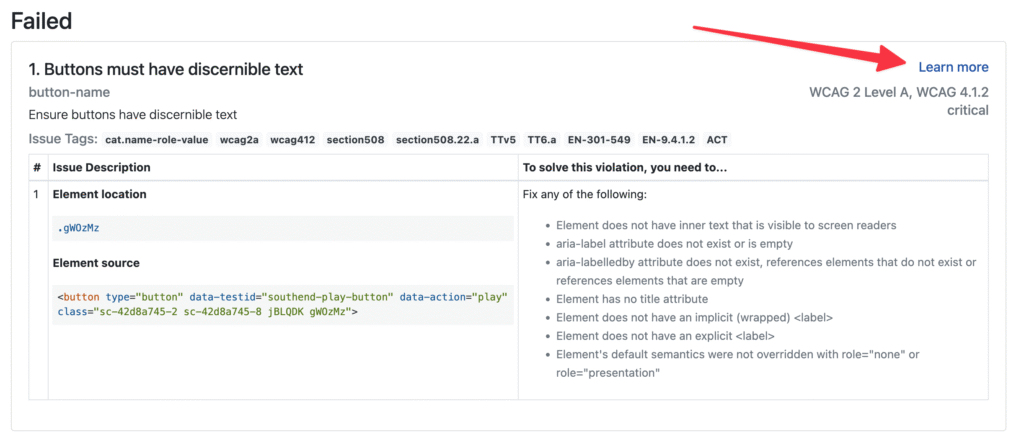
If you want to dive deeper into any of the issues reported by Axe-core, you can use the Learn more links provided directly in the report. Each link will take you to detailed documentation on Deque University, where you’ll find clear explanations, examples of failing and passing code, and practical guidance on how to fix the problem. This makes it much easier to understand even more technical violations, especially if you are new to accessibility testing.
My general recommendation is simple: start with the most critical and serious issues first. These have the biggest impact on users and often require immediate attention. The suggested fixes provided by Axe-core are usually very clear and practical, making it easier to understand what needs to be done.
Typical issues you might encounter include missing form labels, insufficient color contrast, missing alt text on images, keyboard navigation traps, or missing language attributes in your HTML document. All of these have fairly straightforward solutions, once identified.
Lighthouse
Lighthouse reports work a bit differently. You’ll get an overall score in several categories: accessibility, performance, SEO, and best practices. Each issue includes a clear explanation of what’s wrong, how it affects users or performance, and what you can do to fix it. Lighthouse is particularly helpful when you want to review not only accessibility but the overall health of your website.
When you open the Lighthouse accessibility report, you’ll see an overall accessibility score presented as a percentage — the higher the score, the fewer issues were detected. Lighthouse groups accessibility checks into different categories such as:
- ARIA attributes — checks for correct usage of ARIA roles and properties.
- Names and labels — verifies if buttons, links, and form fields have proper labels.
- Contrast — analyzes color contrast between text and background.
- Navigation — checks if page elements are accessible via keyboard navigation.
- Tables and lists — verifies correct semantic structure of lists and tables.
Each failed item includes a short explanation of the problem, affected elements, and clear recommendations on how to fix it. You can expand each issue to see example code and a direct link to related accessibility documentation. Keep in mind that Lighthouse covers only a subset of WCAG rules, so it’s useful for quick checks but should not fully replace more detailed audits like those performed by Axe-core.

Automated testing vs manual testing
No automated tool — not even Axe-core or Lighthouse — can fully replace manual accessibility testing. Automation is very helpful for finding many typical accessibility issues, but some things still need to be checked by a human. For example, automated tools cannot fully test how a screen reader reads the page, how easy it is to navigate using only the keyboard, or whether important information is updated correctly when something changes on the page. They also cannot check if link texts make sense (“click here” may not be helpful), whether headings are used in a logical order, or if images have meaningful alternative text that actually describes their purpose. Manual testing is necessary to make sure real users, especially those with disabilities, can use the website comfortably and without confusion.
That said, automated audits are helpful for early development stages, for quick regression testing, or for fast compliance checks. And this is exactly why I built A11y Audit — to make accessibility testing more efficient and more accessible to everyone involved in software development.
Summary
Accessibility testing can easily feel complex and overwhelming, especially for people who are not deeply familiar with WCAG standards. That’s exactly why I built A11y Audit Tool — to make the process as simple and practical as possible. By combining powerful engines like Axe-core and Lighthouse with additional features such as screenshots, tab order visualization, and the pre-click selector, the tool helps uncover many accessibility issues early in development, before they become costly or difficult to fix. While no automated tool can replace manual accessibility testing entirely, A11y Audit Tool can save a lot of time, simplify audits, and make accessibility a more natural part of everyday work for everyone.
If you have any questions, suggestions, or want to share your experience with the tool — feel free to reach out. And if you find it useful, you can always support the project with a coffee: buycoffee.to/a11yaudit