


When testing APIs, it’s not enough to check for a 200 OK status. We need to ensure the structure of the response is correct and consistent with what’s expected. That’s where JSON Schema validation comes in.
This article walks you through multiple ways to validate API responses using JSON Schema. You’ll work with a realistic example – a mock server that returns a list of cats, and explore how different tools handle schema validation in practice.
Here’s what you’ll learn:
- Build a mock API server in Node.js that returns realistic JSON data
- Define JSON Schema to describe the expected structure of a response
- Validate API responses using a range of tools, including Postman , Cypress , Playwright with Zod and with Ajv
What Is Schema Validation and Why Does It Matter?
Imagine you order a pizza, and instead of receiving a hot, cheesy Margherita, you get a cold bowl of soup. It’s still food, but it’s not what you asked for. The same logic applies to APIs.
When your frontend or automated tests make an API request, they expect a specific structure, certain fields, data types, and formats. Schema validation acts like the “menu agreement” between client and server. It ensures that the response you get matches what you ordered.
Schema validation checks:
- Are all required fields present?
- Are the values of the correct type (e.g. string, boolean, array)?
- Does the data follow the correct format (e.g. UUID, email)?
- Are unexpected fields avoided?
Without schema validation, bugs can creep in silently:
- An API might start returning
nullinstead of an object. - A numeric field might suddenly become a string.
- Optional fields might be missing when your app depends on them.
With schema validation in place, you turn those silent failures into loud and testable errors, exactly what we want in reliable test automation.
So whether you’re working on a large-scale frontend project, a CI pipeline, or a simple smoke test, schema validation helps you catch inconsistencies early, before users (or stakeholders) do.
What Is JSON Schema?
JSON Schema is a way to describe the structure of JSON data. Think of it as a contract or blueprint that defines what a valid response should look like which fields are required, what data types should be used, and how values should be formatted.
It’s like telling your API:
“Hey, every time I ask you for a cat, I expect you to give me an object that includes a name, and that name better be a string.”
JSON Schema is especially useful in automated testing because it helps you automatically verify whether the data returned by an API matches your expectations.
Here’s an example of a simple JSON Schema:
{
  "type": "object",
  "required": ["name"],
  "properties": {
    "name": { "type": "string" }
  }
}
This schema defines:
- The data must be a JSON object.
- The object must contain a required field called
"name". - The
"name"field must be of typestring.
How to Build a Mock API (Cat Edition 😻)
If you want to practice schema validation with real API responses, the best way is to build your own mock server. In this example, we’ll create a simple Node.js server that returns information about cats. This will allow us to test different data types such as strings, numbers, booleans, arrays, and nested objects.
And let’s be honest, since this is CatsAndTests, of course it had to be about cats. Would it even be a proper article here without a few furry test cases?
Step 1: Create a project folder
Before you begin, make sure you have:
- Node.js installed on your machine (you can check by running
node -vin your terminal). - npm (comes with Node.js, check with
npm -v). - A code editor like Visual Studio Code.
You can download Node.js from https://nodejs.org if you don’t have it yet.
Open your terminal and run:
mkdir mock-cat-api
cd mock-cat-api
npm init -y
Now open the folder in Visual Studio Code:
Step 2: Create the mock server
Create a file called server.js and paste the following code:
const http = require("node:http");

const PORT = 8080;

const cats = [
  {
    id: "1",
    name: "Świerzbinka",
    age: 5,
    breed: "Sphynx",
    vaccinated: true,
    favoriteFoods: ["tuna", "chicken"],
    adopted: {
      status: true,
      adoptedAt: "2021-07-15"
    }
  },
  {
    id: "2",
    name: "Kimci",
    age: 3,
    breed: "British Shorthair",
    vaccinated: false,
    favoriteFoods: ["beef", "salmon"],
    adopted: {
      status: false,
      adoptedAt: null
    }
  },
  {
    id: "3",
    name: "Pixel",
    age: 1,
    breed: "Maine Coon",
    vaccinated: true,
    favoriteFoods: [],
    adopted: {
      status: true,
      adoptedAt: "2023-04-01"
    }
  },
  {
    id: 4,
    name: "Puszek",
    age: 7,
    breed: "Persian",
    vaccinated: true,
    favoriteFoods: ["yogurt", "turkey"],
    adopted: {
      status: false,
      adoptedAt: null
    }
  }
];

const server = http.createServer((req, res) => {
  const url = new URL(req.url || "/", `http://localhost:${PORT}`);

  // Endpoint: GET /cats?breed=xyz
  if (url.pathname === "/cats") {
    const breed = url.searchParams.get("breed");

    const filteredCats = breed
      ? cats.filter(cat => cat.breed.toLowerCase() === breed.toLowerCase())
      : cats;

    res.writeHead(200, { "Content-Type": "application/json" });
    return res.end(JSON.stringify(filteredCats));
  }

  // Endpoint: GET /cats/:id
  if (url.pathname.startsWith("/cats/")) {
    const catId = url.pathname.split("/")[2];
    const cat = cats.find(c => c.id === catId);

    if (cat) {
      res.writeHead(200, { "Content-Type": "application/json" });
      return res.end(JSON.stringify(cat));
    } else {
      res.writeHead(404, { "Content-Type": "application/json" });
      return res.end(JSON.stringify({ error: "Cat not found" }));
    }
  }
});

server.listen(PORT, () => {
  console.log(`Cat API is running at http://localhost:${PORT}/cats`);
});
Step 3: Run the server
In your terminal, start the server with:
node server.js
Then open your browser and visit:
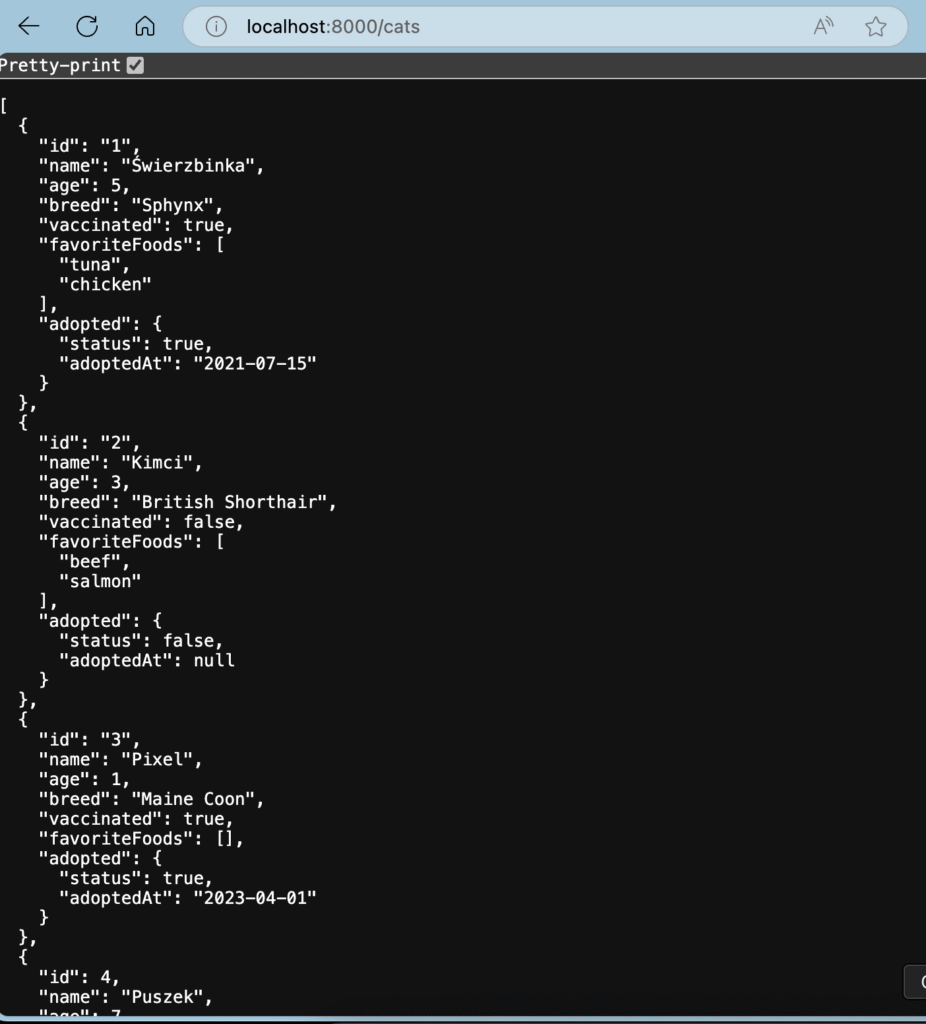
http://localhost:8080/cats
You should see a JSON array of four cats with different data types.
Example response:
 [
  {
    "id": "1",
    "name": "Świerzbinka",
    "age": 5,
    "breed": "Sphynx",
    "vaccinated": true,
    "favoriteFoods": [
      "tuna",
      "chicken"
    ],
    "adopted": {
      "status": true,
      "adoptedAt": "2021-07-15"
    }
  },
  ...
]
Since I already have Jenkins running on port 8080, I changed the mock server to use a different port instead.
Bonus: Mocking the API with json-server
If you don’t want to write a custom Node.js server, there’s a quicker way to mock your API for learning and testing purposes by using json-server.
This tool can turn any JSON file into a full fake REST API in seconds.
Step-by-step Example
- Install json-server globally:
npm install -g json-server - Create a file called
db.json:
{
  "cats": [
    {
      "id": "1",
      "name": "Świerzbinka",
      "age": 5,
      "breed": "Sphynx",
      "vaccinated": true,
      "favoriteFoods": ["tuna", "chicken"],
      "adopted": {
        "status": true,
        "adoptedAt": "2021-07-15"
      }
    },
    {
      "id": "2",
      "name": "Kimci",
      "age": 3,
      "breed": "British Shorthair",
      "vaccinated": false,
      "favoriteFoods": ["beef", "salmon"],
      "adopted": {
        "status": false,
        "adoptedAt": null
      }
    },
    {
      "id": "3",
      "name": "Pixel",
      "age": 1,
      "breed": "Maine Coon",
      "vaccinated": true,
      "favoriteFoods": [],
      "adopted": {
        "status": true,
        "adoptedAt": "2023-04-01"
      }
    },
    {
      "id": 4,
      "name": "Puszek",
      "age": 7,
      "breed": "Persian",
      "vaccinated": true,
      "favoriteFoods": ["yogurt", "turkey"],
      "adopted": {
        "status": false,
        "adoptedAt": null
      }
    }
  ]
}
- Start the server:
json-server --watch db.json --port 8080
Now your API is live at http://localhost:8080/cats.
Why use this?
This is a perfect alternative if you want a quick, zero-code solution to mock your endpoints while learning or testing JSON Schema validation in Cypress, Postman, or Playwright.
What you can test with this mock API
This simple mock server gives you a perfect base to test different aspects of schema validation:
- Required and optional fields
- Strings, numbers, booleans
- Arrays with items
- Nested objects with nullable values
- Specific formats like UUID or date strings
Now you can use tools like Postman, Cypress, or Playwright to validate this structure using JSON Schema.
Awesome! You now have a working mock server with cats, so it’s time to dive into JSON Schema validation in Postman, step by step and in a fun, beginner-friendly way.
Validating Your Cats with JSON Schema in Postman
You’ve built your own mock API. It returns a lovely JSON array of cats with adorable names like Świerzbinka, Kimci, Pixel and Puszek. But now comes the question: How can you make sure this response always has the structure you expect?
Imagine that one day, Świerzbinka forgets to return her age, or Puszek id becomes a number instead of a string.
Your tests might pass silently… but your frontend might crash dramatically.
The answer? JSON Schema validation in Postman.
Here’s how to do it:
Step 1: Make a GET request in Postman
- Open Postman.
- Create a new request.
- Set the method to
GET. - Enter your URL:
http://localhost:8080/cats - Hit Send – you should see a list of cats in the response.

Step 2: Add schema validation
How to do it:
- Open your request in Postman.
- Click on the Scripts tab (in the right-hand sidebar).
- Select the Post-response section- this is where you write assertions and validations.
In previous versions of Postman, tests were written in the Tests tab.
const schema = {
  type: "array",
  items: {
    type: "object",
    required: ["id", "name", "age", "breed", "vaccinated", "favoriteFoods", "adopted"],
    properties: {
      id: { type: "string" },
      name: { type: "string" },
      age: { type: "integer", minimum: 0 },
      breed: { type: "string" },
      vaccinated: { type: "boolean" },
      favoriteFoods: {
        type: "array",
        items: { type: "string" }
      },
      adopted: {
        type: "object",
        required: ["status", "adoptedAt"],
        properties: {
          status: { type: "boolean" },
          adoptedAt: {
            anyOf: [
              { type: "string", format: "date" },
              { type: "null" }
            ]
          }
        }
      }
    }
  }
};

pm.test("Cats response matches schema", function () {
  pm.response.to.have.jsonSchema(schema);
});
Step 3: Run the test
- Click Send again.
- Go to the Tests tab in the response panel.
- If everything is correct, you’ll see: “Cats response matches schema”.
Why this is awesome
- You now validate not just if the API responds — but what exactly it returns.
- If any field is missing or has the wrong type, Postman will alert you immediately.
- This is a lightweight form of contract testing — and it works great even in manual or exploratory testing.
When Puszek breaks things
In the current dataset, Puszek has an id set as a number instead of a string:
"id": 4That small detail is enough to make your schema validation fail. Postman will catch the issue immediately:
AssertionError: expected data to satisfy schema but found following errors: data[3].id should be stringProblem spotted — thanks to schema validation. Now imagine trying to find that manually in a large API response.
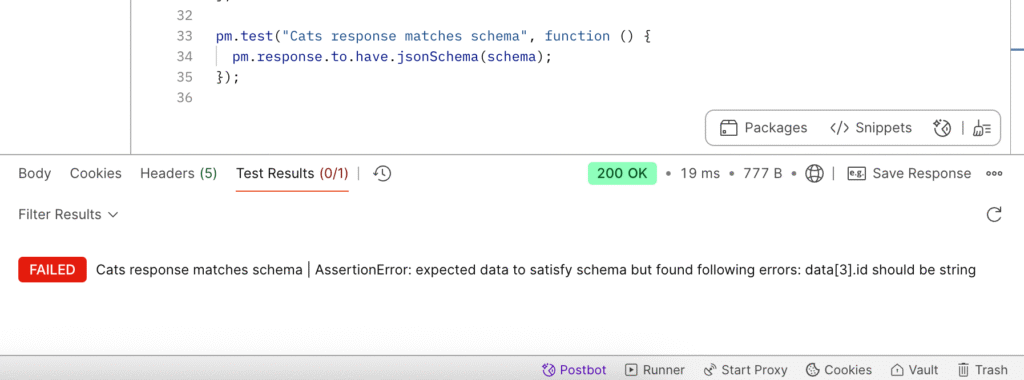
When validating an array of objects in Postman using JSON Schema, the test output will often tell you at which index the validation failed. This is especially helpful when dealing with a list of items, such as an array of cats.
Keep in mind that array indexing starts at 0, not 1. So if Postman reports an error at index 3, it’s referring to the fourth item in the array. This follows standard JavaScript behavior and helps you pinpoint exactly where the problem is, whether it’s a missing field, an unexpected data type, or an invalid format.
Understanding this can save you time when debugging schema failures in large responses.
JSON Schema validation in Postman is a powerful yet simple way to ensure your API responses are consistent, reliable, and safe.
How to Create a JSON Schema (Without Going Wild)
Creating a JSON Schema might look scary at first, but it’s actually very logical. Think of it as a blueprint that describes exactly how your JSON response should look.
Here’s how to build one, step by step, based on our cat API.
Step 1: What kind of data are you expecting?
In our case, the response is a list of cat objects, so we start like this:
const schema = {
  type: "array", // We're expecting an array (a list)
  items: { ... } // Each item in the list will follow the same structure
};
Step 2: Describe the structure of each object
Inside items, we define an object:
items: {
  type: "object",
  required: [...],
  properties: { ... }
}
"type": "object"– each item is an objectrequired: a list of keys that must be presentproperties: each field and its expected type
Step 3: Set up properties and types
This is where we define what each key looks like:
properties: {
  id: { type: "string" },
  name: { type: "string" },
  age: { type: "integer", minimum: 0 },
  ...
}
Some notes:
- Use
"string","integer","boolean","array", or"object"astype. - You can add rules like
minimum,format, orenumto restrict values.
Step 4: Add nested objects and arrays
If a property is an object itself (like adopted), describe it the same way:
adopted: {
  type: "object",
  required: ["status", "adoptedAt"],
  properties: {
    status: { type: "boolean" },
    adoptedAt: {
      anyOf: [
        { type: "string", format: "date" },
        { type: "null" }
      ]
    }
  }
}
If a property is an array (like favoriteFoods), define what each item in the array should be:
favoriteFoods: {
  type: "array",
  items: { type: "string" }
}
In short:
- Always start with
type - Use
propertiesto describe each field - Use
requiredto make sure fields aren’t missing - Nest as needed for objects and arrays
Validating JSON Schema in Cypress
Cypress is known for end-to-end testing, but it’s also a great tool for testing APIs. One powerful feature you can add to your API tests is JSON Schema Validation which lets you verify not just the data, but the exact structure of your API response.
And yes, it’s easier than you think. Let’s go step-by-step.
Step 1: Set Up Your Cypress Project
If you don’t already have Cypress in your project, install it:
npm install --save-dev cypress
Open Cypress once to generate the folders:
npx cypress open
Step 2: Install the Schema Validation Plugin
Cypress uses Chai for assertions, so we can use a plugin called chai-json-schema.
npm install --save-dev chai-json-schema
Now, let’s register the plugin. Open or create the file:
cypress/support/e2e.js
Add this:
import chaiJsonSchema from 'chai-json-schema';
chai.use(chaiJsonSchema);
This adds a new assertion to your toolbox: .to.be.jsonSchema().
Step 3: Write the Schema and the Test
Let’s create a test file:
cypress/e2e/cat-schema.cy.js
Paste this example:
const catArraySchema = {
  type: "array",
  items: {
    type: "object",
    required: ["id", "name", "age", "breed", "vaccinated", "favoriteFoods", "adopted"],
    properties: {
      id: { type: "string" },
      name: { type: "string" },
      age: { type: "integer", minimum: 0 },
      breed: { type: "string" },
      vaccinated: { type: "boolean" },
      favoriteFoods: {
        type: "array",
        items: { type: "string" }
      },
      adopted: {
        type: "object",
        required: ["status", "adoptedAt"],
        properties: {
          status: { type: "boolean" },
          adoptedAt: {
            anyOf: [
              { type: "string", format: "date" },
              { type: "null" }
            ]
          }
        }
      }
    }
  }
};

describe("Validate /cats API response with array schema", () => {
  it("should return a valid array of cats", () => {
    cy.request("http://localhost:8080/cats").then((response) => {
      expect(response.status).to.eq(200);
      expect(response.body).to.be.an("array");

      // General schema validation
      expect(response.body).to.be.jsonSchema(catArraySchema);
    });
  });
});
Step 4: Run Your Test
To launch the Cypress runner:
npx cypress open
Or use headless mode:
npx cypress run
When Things Break – Puszek again 😉
Let’s say your API returns this:
{
  "id": 4,
  "name": "Puszek",
  ...
}
That id is a number — but your schema expects a string. You’ll get an error in Cypress like:
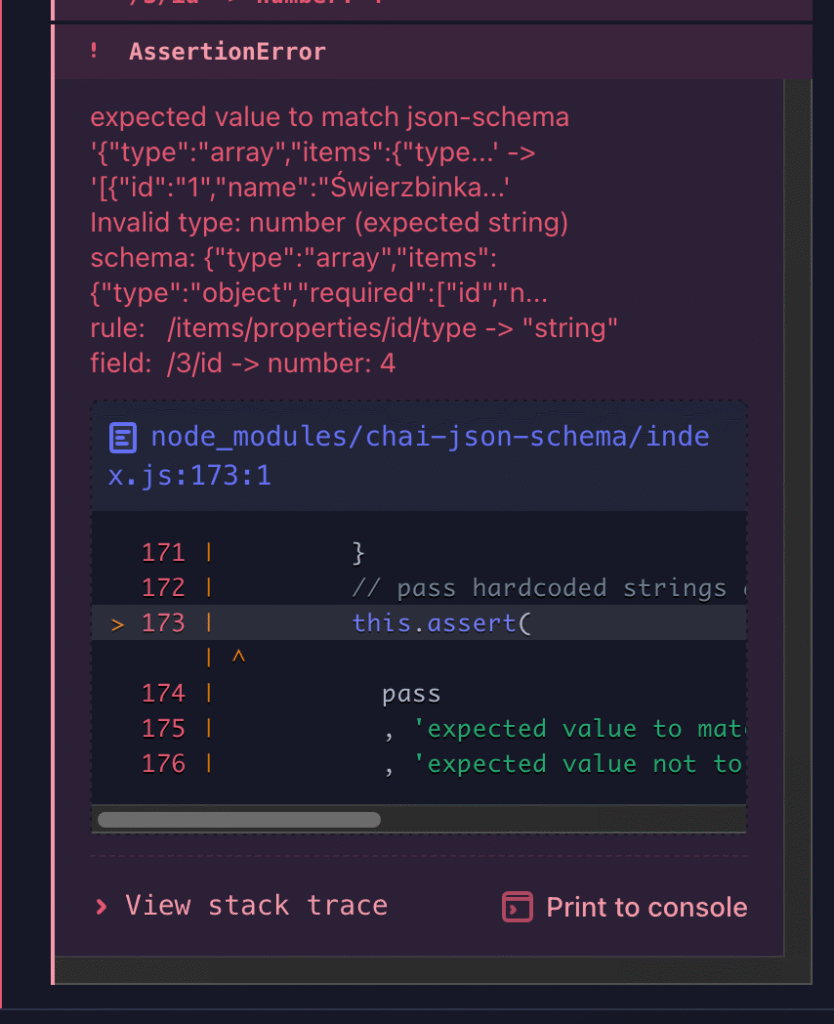
or if you perefer catch a bugs in console:
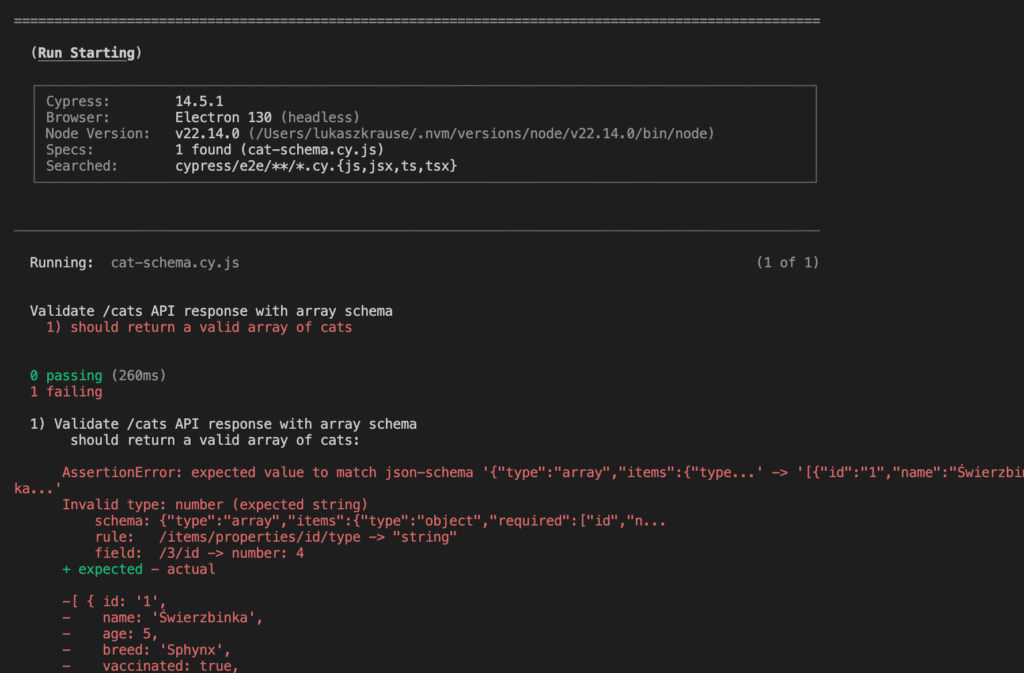
Nice and clear. That’s the power of schema validation.
Validating JSON Responses in Playwright
Playwright is most often associated with browser automation and end-to-end testing. But did you know it’s also a powerful tool for API testing?
In Playwright, there are two excellent ways to validate JSON response schemas:
Option 1: Using Zod – Developer-friendly schema validation
Zod is a modern TypeScript-first validation library that allows you to define schemas in a readable, object-oriented way. It’s ideal if you’re working in JavaScript or TypeScript and want something easy to read, write, and extend.
It throws helpful, detailed errors when the shape of your data doesn’t match the expected structure. Perfect for catching subtle bugs (like a number instead of a string, or a missing field).
Option 2: Using Ajv – JSON Schema standard compliance
Ajv is a high-performance JSON Schema validator that follows the official JSON Schema spec. If you’re already writing schemas for Postman or sharing them with other tools, Ajv gives you full compatibility with that ecosystem.
It’s great for projects that require strict schema validation, support for formats like date, and interoperability with tools like Swagger or OpenAPI.
In the next sections, we’ll walk through both approaches using a fun example: an API that returns a list of cats. You’ll see how to:
- Install and configure each validator
- Write the schema
- Run assertions in Playwright
- Catch and debug real validation errors
Let’s dive in.
Option 1: Schema Validation with Zod
Zod is a modern TypeScript-first schema validation library that’s lightweight, developer-friendly, and great for writing readable, maintainable tests.
Step 1: Install Zod
npm install zod
Step 2: Create a Zod Schema
Here’s how you can define a validation schema for a single cat object:
import { z } from "zod";

const CatSchema = z.object({
  id: z.string(),
  name: z.string(),
  age: z.number().int().nonnegative(),
  breed: z.string(),
  vaccinated: z.boolean(),
  favoriteFoods: z.array(z.string()),
  adopted: z.object({
    status: z.boolean(),
    adoptedAt: z.string().datetime().or(z.null()),
  }),
});
How Zod Schema Syntax Works
When you use Zod, you’ll often see the z. prefix before each type. Here’s what it means and how to understand it:
z is the Zod object
When you import z like this:
import { z } from "zod";
…it gives you access to all the Zod validators. You can think of z as the toolbox.
Common z validators:
| Syntax | Meaning | Example Value |
|---|---|---|
z.string() | Must be a string | "cat" |
z.number() | Must be a number (can be decimal) | 5, 3.14 |
z.number().int() | Must be an integer | 3, not 3.5 |
z.boolean() | Must be true or false | true |
z.array(z.string()) | Array of strings | ["tuna", "salmon"] |
z.object({...}) | Nested object with specific fields | { status: true, ... } |
z.null() | Must be exactly null | null |
z.string().datetime() | String in ISO 8601 date-time format | "2023-05-01T12:00:00Z" |
.or(...) | Accepts one of multiple types | z.string().or(z.null()) |
Real Example from Our Cat API
age: z.number().int().nonnegative()
Means:
- Must be a number
- Must be an integer
- Must be 0 or more
adoptedAt: z.string().datetime().or(z.null())
Means:
- Must be either a string in date-time format or
null
Step 3: Use the Schema in a Playwright Test
Now let’s validate the entire array of cat objects returned from /cats:
import { test, expect } from "@playwright/test";
import { z } from "zod";

const CatArraySchema = z.array(CatSchema);

test("Zod: /cats returns valid array of cat objects", async ({ request }) => {
  const response = await request.get("http://localhost:8000/cats");
  const body = await response.json();

  await expect(response).toBeOK();
  expect(() => CatArraySchema.parse(body)).not.toThrow();
});
If the response contains any object that doesn’t match the schema ,for example, if one id is a number instead of a string the test will fail with a helpful explanation like:
ZodError: [
  {
    "code": "invalid_type",
    "expected": "string",
    "received": "number",
    "path": [3, "id"],
    "message": "Expected string, received number"
  }
]
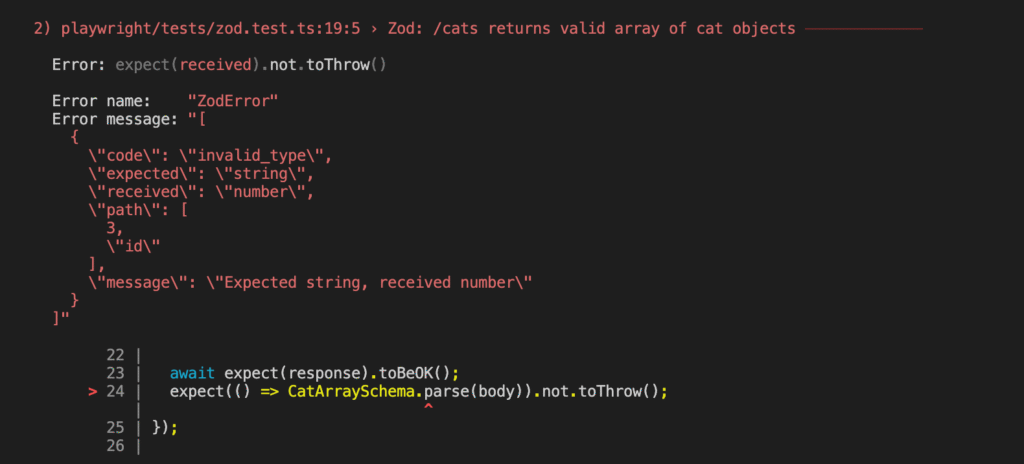
This makes debugging easy and quick.
Option 2: Using Ajv in Playwright
If you’re already familiar with JSON Schema validation in Postman, you’ll find Ajv in Playwright very similar.
Ajv is a powerful JSON Schema validator used under the hood in many tools, including Postman and Chai plugins. You write a standard JSON schema, compile it with Ajv, and validate the response.
Here’s a minimal example that validates an array of cat objects:
import { test, expect } from "@playwright/test";
import Ajv from "ajv";

const schema = {
  type: "array",
  items: {
    type: "object",
    required: ["id", "name", "age", "breed", "vaccinated", "favoriteFoods", "adopted"],
    properties: {
      id: { type: "string" },
      name: { type: "string" },
      age: { type: "integer", minimum: 0 },
      breed: { type: "string" },
      vaccinated: { type: "boolean" },
      favoriteFoods: {
        type: "array",
        items: { type: "string" }
      },
      adopted: {
        type: "object",
        required: ["status", "adoptedAt"],
        properties: {
          status: { type: "boolean" },
          adoptedAt: {
            anyOf: [
              { type: "string", format: "date" },
              { type: "null" }
            ]
          }
        }
      }
    }
  }
};

test("Ajv: validates /cats response", async ({ request }) => {
  const response = await request.get("http://localhost:8000/cats");
  const body = await response.json();

  const ajv = new Ajv({ allErrors: true });
  const validate = ajv.compile(schema);
  const valid = validate(body);

  expect(valid, JSON.stringify(validate.errors, null, 2)).toBe(true);
});
Below I will show you the explanation of this Ajv-based test, broken down step by step:
test("Ajv: /cats returns valid array of cat objects", async ({ request }) => {
This defines a test.
It’s named "Ajv: /cats returns valid array of cat objects" and uses Playwright’s request feature to send an HTTP request.
const response = await request.get("http://localhost:8080/cats");
const body = await response.json();
Send a request and read the response.
The test sends a GET request to your local server at /cats.
Then it reads the response body and parses it into a JavaScript object using .json().
await expect(response).toBeOK();
expect(Array.isArray(body)).toBeTruthy();
Check basic response validity.
First, it makes sure the HTTP response was successful (like status code 200).
Then, it checks that the returned data is an array as expected (since /cats should return a list of cats).
const ajv = new Ajv({
  allErrors: true,
  strict: true,
  coerceTypes: false,
});
Create a validator.
Here, we create a new instance of the Ajv schema validator.
allErrors: truemeans Ajv will return all validation errors, not just the first one.strict: trueenables strict mode, which helps catch mistakes in your schema.coerceTypes: falseprevents Ajv from automatically converting types (e.g., turning"5"into5).
const validate = ajv.compile(schema);
Compile the schema.
Ajv takes your predefined JSON Schema and compiles it into a validation function.
This function can now check if data matches the expected structure.
const valid = validate(body);
Run the validation.
Here, the test passes the response (body) into the compiled validation function.
If the data matches the schema, it returns true.
If something is wrong (e.g., a missing field or wrong type), it returns false.
expect(valid, `Validation failed:\n${JSON.stringify(validate.errors, null, 2)}`).toBe(true);
Assert that the data is valid.
This line checks whether the data is valid.
If not, it prints out all validation errors in a readable format so you can debug the problem easily.
This test uses Ajv to make sure that the /cats API returns a correctly structured list of cat objects.
It validates not only that the API is working but also that the response follows a defined schema, helping you catch hidden problems early.
Summary:
JSON Schema Validation is a powerful way to ensure your API responses are not only correct — but consistent, structured, and safe to work with.
In this guide, you explored three practical ways to validate JSON schemas across different tools:
Postman
Ideal for quick checks and manual testing. Postman supports schema validation directly in the Tests tab (or Scripts → post-response in the new UI).
It’s fast to implement, readable, and helpful during exploratory or regression testing.
Cypress + chai-json-schema
A great choice if you’re already using Cypress for frontend or E2E testing.
Schema validation in Cypress requires just one plugin and lets you validate full response structures right in your API or UI tests.
The downside? Less detailed error messages compared to other tools.
Playwright
Two options here:
- Zod: A modern, code-driven approach to schema validation. You define your schemas in JavaScript/TypeScript with full type safety and excellent error feedback.
- Ajv: A traditional JSON Schema validator that uses the same format as Postman. Great if you already use JSON Schema files elsewhere and want strict validation.
What You’ve Learned
- How to build your own mock API server to practice with real-world data
- How JSON Schema helps prevent bugs by enforcing response structure
- How to implement schema validation in Postman, Cypress, and Playwright
- How to choose the right tool depending on your workflow
No matter which tool or syntax you prefer, the key takeaway is simple:
Don’t just test if the API works — test if it’s returning what it’s supposed to.
If you’re building serious tests, adding schema validation is one of the easiest and most valuable upgrades you can make.
In this project, I’ve included both Playwright and Cypress side by side to demonstrate how JSON Schema validation works in each tool. While this setup isn’t typical for production code, it’s perfect for educational purposes and tool comparison. Link to GitHub repo where you can find code from this article: GitHub Repository
And just for fun, here’s a photo of Świerzbinka and Kimci:

