

When it comes to test automation, there are countless tools out there, each with its own learning curve and strengths. One of the solutions that has gained real popularity among testers and QA teams is Katalon Studio. Beginners can quickly create automated tests without needing advanced coding skills, while experienced testers can dive deeper and build complex frameworks with custom scripts.
Katalon Studio can be used across different platforms, including web, mobile, desktop, and API testing. This makes it a versatile choice for teams that want to keep everything in one place rather than juggling multiple tools. With features like built-in keywords, record-and-playback options, and seamless integration with CI/CD pipelines, it is a solid choice whether you are just starting your automation journey or looking for a scalable solution for enterprise projects.
Some time ago, on the pages of testuj.pl, I wrote an article about testing web applications in Katalon Studio. That piece focused mainly on browser-based automation. Now I would like to expand on this topic by exploring how Katalon Studio can be applied to mobile application testing. The landscape has changed a lot since then, and mobile testing brings its own set of challenges and opportunities that are worth highlighting.
Getting started with Katalon Studio
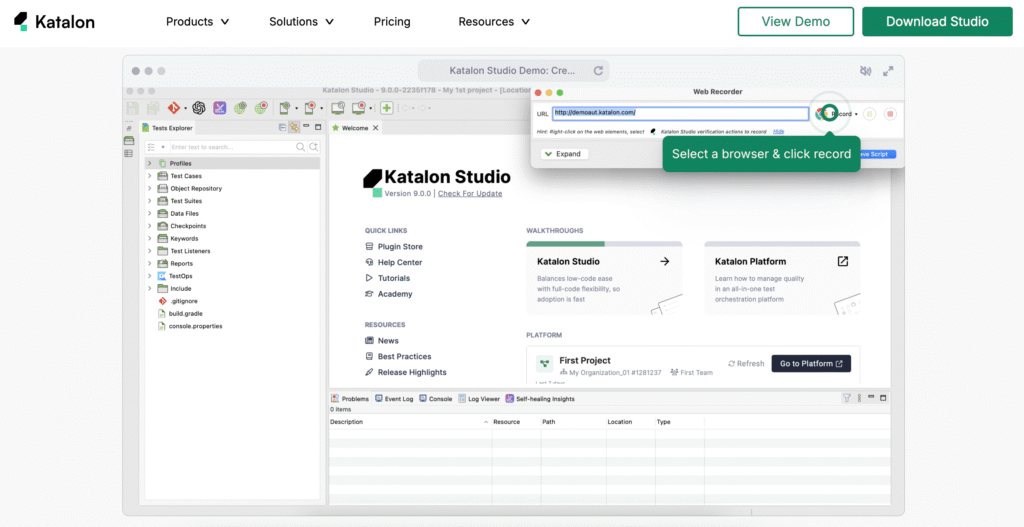
To try it out yourself, the first step is downloading Katalon Studio from the official website at katalon.com. The tool is available for Windows, macOS, and Linux, and the installation process is straightforward. Once you create a free Katalon account, you can download the installer that matches your operating system. After installation, you will be able to sign in with your account and access all the features right away. The platform also offers a free version, which is a great way to explore its capabilities before considering enterprise options.
Preparing your environment for mobile testing
Installing Katalon Studio is only the first step. To test mobile applications, you need to set up a few additional tools that work together with Katalon. The most important one is Appium, which acts as a bridge between Katalon and mobile devices. Appium allows you to send commands to Android or iOS apps just like a user would, tapping, swiping, or typing into fields. To run Appium, you also need Node.js, since Appium itself is built on top of it.
For Android testing, make sure you install the Android SDK and set up ADB (Android Debug Bridge), which lets your computer communicate with physical devices or emulators. If you plan to use an emulator, having Android Studio installed will make it much easier to create and manage virtual devices. For iOS testing, you will need Xcode on a macOS machine.
Once these components are in place, you can point Katalon Studio to the correct SDK and Appium paths in its preferences. After that, you are ready to connect a phone or start an emulator, build your first test case, and see your app being tested automatically.
Setting up your mobile device
Besides configuring your computer, you also need to prepare the mobile device that will run your tests. On Android, the first step is to enable Developer Options. You can do this by opening the phone’s settings, going to About phone, and tapping the Build number entry several times until a message confirms that developer mode is active. Once enabled, you will find a new section called Developer options in your system settings. Inside, make sure to switch on USB debugging. This allows your computer, through ADB, to communicate with the phone and send commands during automated tests.
When you connect the device for the first time, you will see a pop-up asking you to trust the computer. Accepting it ensures that Katalon Studio and Appium can control the device. For a smoother workflow, keep the device connected via USB or set it up for wireless debugging if supported.
For iOS, the process is slightly different and requires enabling developer mode via Xcode and confirming that your Mac is trusted on the device. Once that is done, Katalon Studio can also run tests on iOS apps.
This article is written with beginners in mind, so I will focus on testing mobile applications on Android devices. Setting up Android is usually simpler and more accessible, especially since you can use either a physical phone or an emulator. iOS testing requires additional steps, a macOS environment, and Xcode, which can be a bit more advanced. That is why we will start with Android as a practical and beginner-friendly entry point into mobile automation with Katalon Studio.
For iOS, the process is more advanced and comes with some unique requirements. First, you need a macOS environment, because iOS automation depends on Apple’s developer tools. Xcode must be installed, since it provides the iOS simulators, libraries, and command-line tools required by Appium. On top of that, you need to configure a developer provisioning profile and valid signing certificates to allow automation tools to interact with your iOS apps. Without this, the tests cannot be installed or executed on a real device.
Another difference is that emulators on Android are easy to use and available on any platform, but iOS simulators are only accessible through Xcode on a Mac. In practice, this means many teams start mobile automation with Android, as it is quicker to set up and does not require dealing with Apple’s provisioning system. However, if your application must support iOS, you should plan extra time for configuring certificates, profiles, and ensuring your environment meets Apple’s requirements.
Verifying the Appium path in Katalon Studio
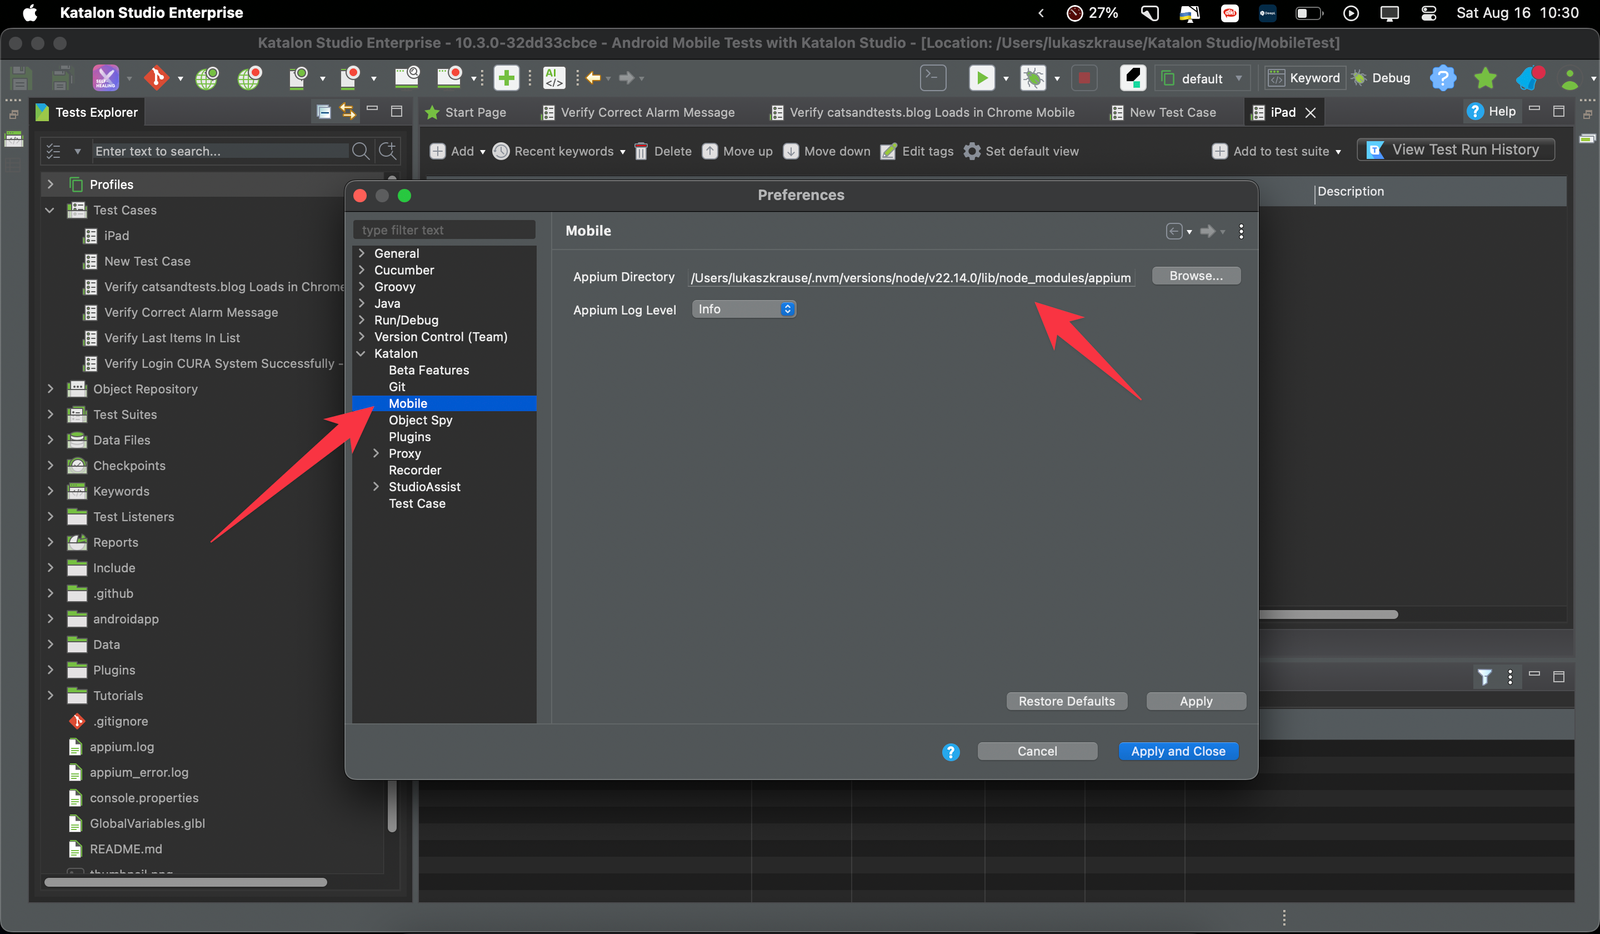
Once you have installed all the required components, it is important to make sure Katalon Studio knows where to find Appium. Without this step, your mobile tests will not run properly. Open Katalon Studio Preferences and navigate to the section for Mobile. There you will see a field for the Appium directory. Check that the path points to the location where Appium is installed on your machine. If you are using a global installation through Node.js, the path usually points to the npm folder where Appium is stored. Correcting this path ensures that Katalon can communicate with Appium and successfully execute commands on your connected device.
Starting your first mobile test in Katalon Studio
Finding the application ID
To run tests on a mobile app, Katalon Studio needs the application ID (also called package name) of the app you want to test. For Android, this is usually in the format com.vendor.appname, for example com.android.chrome for the Chrome browser.
You can find it easily using ADB (Android Debug Bridge):
- Connect your device with USB debugging enabled.
- Open a terminal or command prompt.
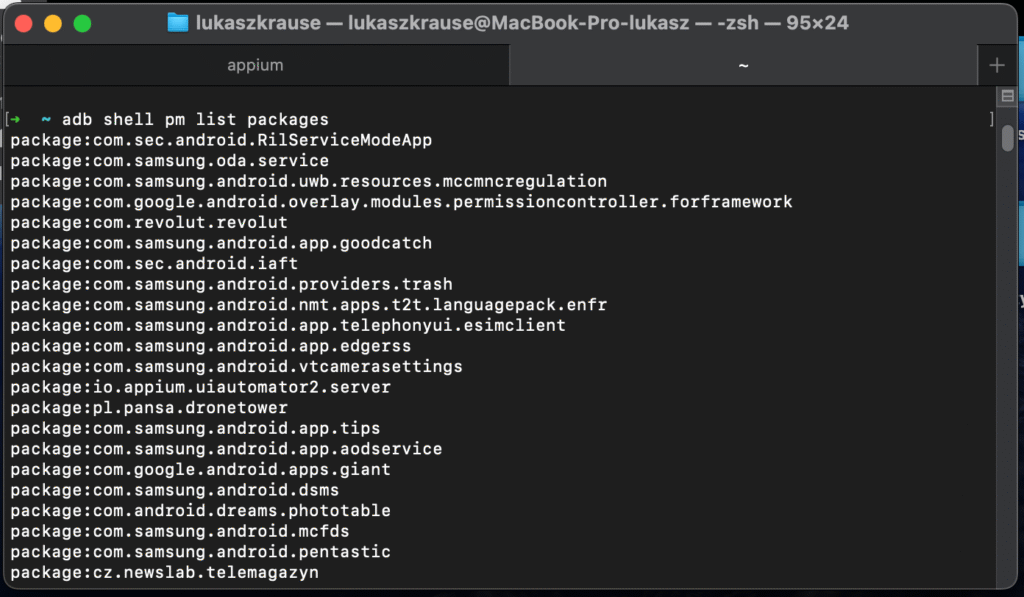
- To list all installed packages, run:
adb shell pm list packages
This will display every package name currently on your device.
- To search for a specific app, add a keyword with grep. For example, to find Chrome:
adb shell pm list packages | grep chrome
The result will look like:
package:com.android.chrome
You can replace chrome with any keyword to find another app (for example whatsapp, facebook, or part of the app name).
Creating a new project
Once your environment and device are ready, you can create your first test in Katalon Studio. Here is a simple way to get started:
- Create a new project Open Katalon Studio and select File > New > Project. Give it a name, for example MobileDemo.
- Set up a test case In the Tests Explorer panel, right-click on Test Cases and choose New > Test Case. Name it something descriptive like Open Chrome App.
- Add Mobile keywords In the script editor, you can use Katalon’s built-in mobile keywords. A minimal example to open an app looks like this:
import static com.kms.katalon.core.testobject.ObjectRepository.findTestObject
import com.kms.katalon.core.mobile.keyword.MobileBuiltInKeywords as Mobile

Mobile.startExistingApplication('com.android.chrome')
Mobile.delay(5)
Mobile.closeApplication()
- startApplication launches the app by its package ID.
- delay keeps the app open for a few seconds.
- closeApplication shuts it down.
Click the Run button and select Android Device. If everything is set up correctly, Katalon will open Chrome on your connected phone or emulator.
This simple test proves that your environment is configured properly. From here, you can expand with actions such as tapping elements, entering text, and validating results using the Object Repository and the Mobile Recorder tool built into Katalon Studio.
Using the Mobile Recorder to capture test steps
Katalon Studio makes it much easier to create mobile tests thanks to the Mobile Recorder. Instead of writing all steps manually, you can interact with the app on your device or emulator while Katalon records the actions for you.
- Launch the Mobile Recorder In your Katalon project, click on the Mobile Recorder icon from the toolbar or go to Tools > Mobile > Record Mobile.
- Connect to a device Select Android Device and make sure your phone (with USB debugging enabled) or an emulator is visible in the list. Then choose the application to test by either browsing for the .apk file or entering the package ID (for example com.android.chrome).
- Record interactions Once the app launches, every action you take like tapping a button, entering text, or swiping will be captured in the recorder. Katalon automatically generates test steps with the correct Mobile keywords.
- Locating elements When you perform an action, Katalon saves the element into the Object Repository. Each element has properties such as resource-id, class, text, or xpath that uniquely identify it. You can view and refine these properties in the repository.
- For example, a login button might be saved with the resource-id com.example.app:id/login_button.
- If the default locator is not stable, you can adjust the attributes or use a custom XPath to improve reliability.
- Save and run the test After recording, click Save and Katalon will create a ready-to-run test case. You can then execute it on your device or emulator just like any manually written script.
Mobile Recorder works well for basic things. You can use it to open an app, tap on elements, and quickly record simple actions. It is great when you want to get started fast.
But in real tests, you often need more control. In my case, the test sometimes started with a page already open in Chrome. The locator I had for the toolbar button was not stable. On a blank start, it could open settings, but when a page was loaded, it opened the menu instead. With a normal APK, this problem is easier because you can restart the app from zero each time. With Chrome, I had to deal with an app that was already running, so I needed to make my script smarter and check the state first.
I also had to find out how to press Enter on the virtual keyboard to load the page after typing the address. The recorder does not add this step, so I wrote a small piece of code to do it. The same happened with the cookies banner. Sometimes it was there, sometimes not, so I made the script look for the button and tap it only if it appeared.
One important thing to keep in mind when working with Katalon Studio is the stability of locators. The Mobile Recorder is very helpful for getting started quickly, but the locators it generates by default are often not reliable.
For example, you might see steps like:
Mobile.tap(findTestObject('Object Repository/android.widget.ImageButton'), 0)
or
android.widget.EditText - Search Google or type URL (1)
These are usually based on class names or auto-generated labels, which can easily change between app versions or even across devices.
A better practice is to use the Capture Object option. This allows you to directly select the element on the device or emulator and save it into your project with its properties:
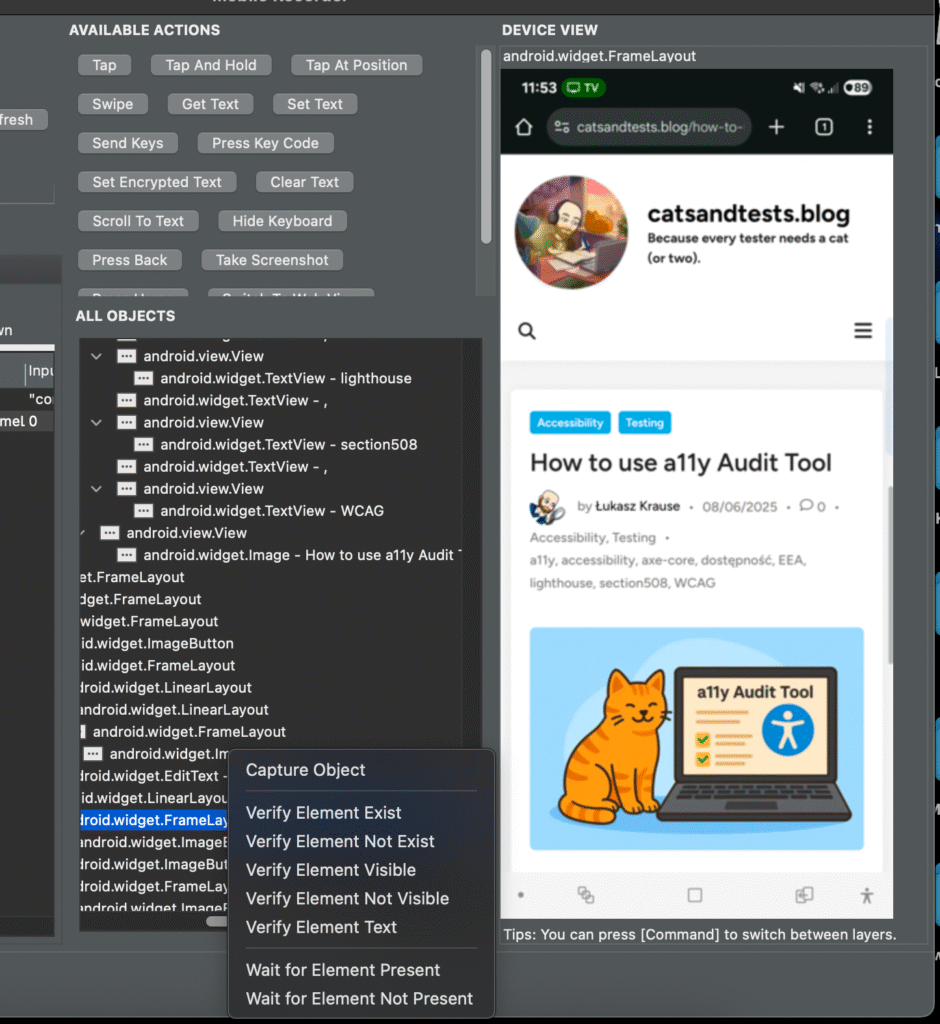
After capturing, go to the Object Repository and refine the locator. For mobile elements, choosing a stable property such as resource-id (or another unique attribute) makes your tests much more robust and less prone to breaking.
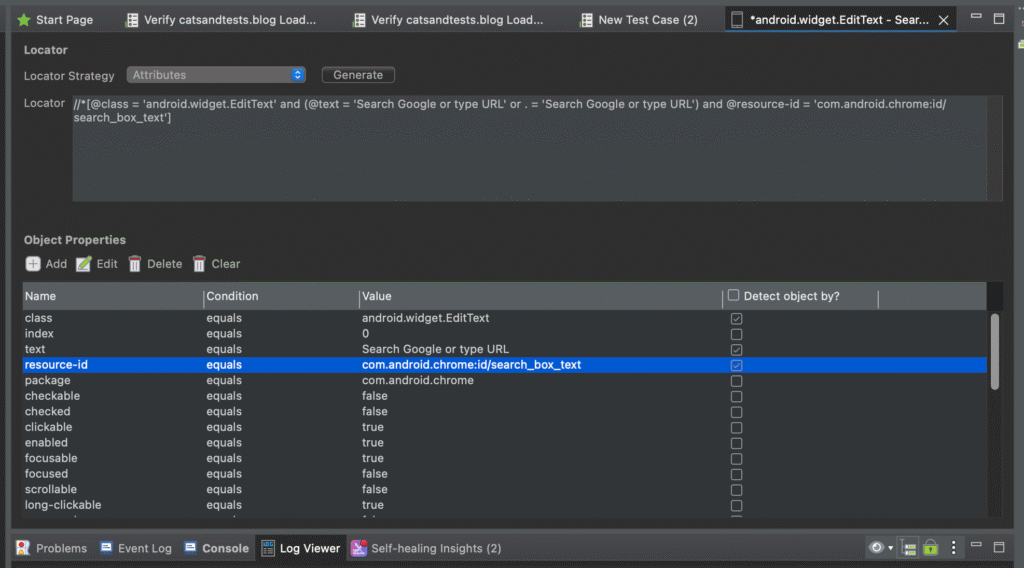
Another important detail is that some of the default locators generated by Mobile Recorder depend on the language version of your device. For example, Chrome’s address bar may appear as “Search Google or type URL” on an English device but as “Wyszukaj w Google lub wpisz adres URL” on a Polish one. A test recorded in one language will therefore fail if executed on a device set to a different language.
This is another reason why relying on auto-generated labels or class names is risky. To build stable tests, always capture the object manually and refine its properties in the Object Repository using language-independent attributes like resource-id.
So the recorder helps you with the basics, but you often need to add your own logic. A few extra checks, a way to send the Enter key, and a condition for the cookies banner made my test much more stable.
Building a Chrome test in Katalon Studio
I combined Mobile Recorder with some extra automation logic to make the test stable. The recorder was helpful to capture basic actions like launching the app or tapping elements. But real-life testing needed more flexibility.
The logic of the test is straightforward. First, it opens the Chrome browser on the device and checks whether Chrome starts with a fresh tab or with a page already loaded. If a page is already open, the script creates a new tab to ensure consistency. Next, it focuses the address bar, types in the target URL, and simulates pressing Enter to load the page. It also handles dynamic conditions, such as a cookies banner or a result card that sometimes appears before navigating to the actual site. Finally, it verifies that the expected content is present on the page and then closes Chrome.
This flow shows how to combine automatically recorded steps with custom logic (checking Chrome’s state, handling optional banners, and pressing Enter programmatically).
Here’s the complete Katalon script, ready to paste:
import com.kms.katalon.core.mobile.keyword.MobileBuiltInKeywords as Mobile
import com.kms.katalon.core.mobile.keyword.internal.MobileDriverFactory as MobileDriverFactory
import com.kms.katalon.core.model.FailureHandling as FH
import com.kms.katalon.core.util.KeywordUtil

import com.kms.katalon.core.testobject.TestObject
import com.kms.katalon.core.testobject.ConditionType

import io.appium.java_client.android.AndroidDriver
import io.appium.java_client.android.nativekey.AndroidKey
import io.appium.java_client.android.nativekey.KeyEvent

// Launch Chrome by its package ID
Mobile.startExistingApplication('com.android.chrome')

// Define dynamic TestObjects using resource-id / text
TestObject searchBox = new TestObject('searchBox')   // Start screen search field
searchBox.addProperty('resource-id', ConditionType.EQUALS, 'com.android.chrome:id/search_box_text')

TestObject urlBar = new TestObject('urlBar')         // Main address bar
urlBar.addProperty('resource-id', ConditionType.EQUALS, 'com.android.chrome:id/url_bar')

TestObject newTabBtn = new TestObject('newTabBtn')   // Toolbar button for opening a new tab
newTabBtn.addProperty('resource-id', ConditionType.EQUALS, 'com.android.chrome:id/optional_toolbar_button')

TestObject acceptBtn = new TestObject('acceptBtn')   // Cookies banner accept button
acceptBtn.addProperty('class', ConditionType.EQUALS, 'android.widget.Button')
acceptBtn.addProperty('text', ConditionType.EQUALS, 'Accept')

TestObject resultCard = new TestObject('resultCard') // Optional result card
resultCard.addProperty('class', ConditionType.EQUALS, 'android.widget.TextView')
resultCard.addProperty('text', ConditionType.CONTAINS, 'catsandtests.blog')

// Detect Chrome state: start screen (searchBox visible) vs. page already loaded
boolean onStartScreen = Mobile.verifyElementExist(searchBox, 5, FH.OPTIONAL)

if (onStartScreen) {
    Mobile.tap(searchBox, 0)  // Focus the search field
} else {
    if (Mobile.verifyElementExist(newTabBtn, 5, FH.OPTIONAL)) {
        Mobile.tap(newTabBtn, 0)  // Open a new tab
    } else {
        KeywordUtil.logInfo('New Tab button not found; attempting to focus url_bar directly')
    }
}

// Ensure urlBar is visible before typing
if (!Mobile.verifyElementExist(urlBar, 5, FH.OPTIONAL)) {
    if (Mobile.verifyElementExist(searchBox, 3, FH.OPTIONAL)) {
        Mobile.tap(searchBox, 0)  // Retry by tapping searchBox
    }
}

// Fail if urlBar is still not available
if (!Mobile.verifyElementExist(urlBar, 5, FH.OPTIONAL)) {
    Mobile.takeScreenshot()
    KeywordUtil.markFailed('Chrome url_bar not found')
}

// Enter the target URL
Mobile.sendKeys(urlBar, 'https://catsandtests.blog/')

// Simulate pressing Enter on the virtual keyboard
AndroidDriver driver = (AndroidDriver) MobileDriverFactory.getDriver()
driver.pressKey(new KeyEvent(AndroidKey.ENTER))

// Handle cookies banner if present
if (Mobile.verifyElementExist(acceptBtn, 3, FH.OPTIONAL)) {
    Mobile.tap(acceptBtn, 0)
}

// Verify page content
TestObject content = findTestObject('Object Repository/android.widget.EditText - catsandtests.blog')
if (Mobile.verifyElementExist(content, 10, FH.OPTIONAL)) {
    String elementText = Mobile.getText(content, 5)
    assert elementText.contains('catsandtests.blog')
}

// Close Chrome gracefully
Mobile.closeApplication()
In Katalon Studio, every step can be told how strict it should be when something goes wrong. Normally, if an element is missing, the test will fail and stop right away. Sometimes, however, this is too strict, because not every element is guaranteed to appear on the screen. That is where FH.OPTIONAL comes in. By marking a step as optional, Katalon simply checks if the element is there, and if not, it quietly continues without treating it as an error. This is perfect for cases like a cookies banner that only shows up occasionally or when Chrome may start in different states. Thanks to this option, the test can adapt to different scenarios without breaking unnecessarily.
The script above was created to demonstrate the possibilities of Katalon Studio when automating mobile applications. It shows how to start Chrome, handle different starting states (new tab or already open page), navigate to a website, deal with a cookies banner, and verify page content.
This test is not meant to be a production-ready solution. Its main goal is to highlight what can be achieved with Katalon in mobile testing scenarios.
How to run the test
- Open Katalon Studio and make sure your mobile project is set up.
- Connect your Android device (or start an emulator) with USB debugging enabled.
- Verify that your device is connected by running the following command in a terminal:
adb devices
- If you see your device listed with the status device, you’re ready to go. If it shows unauthorized, unlock your phone and allow USB debugging access.
- Create a new Test Case and paste the script into the editor.
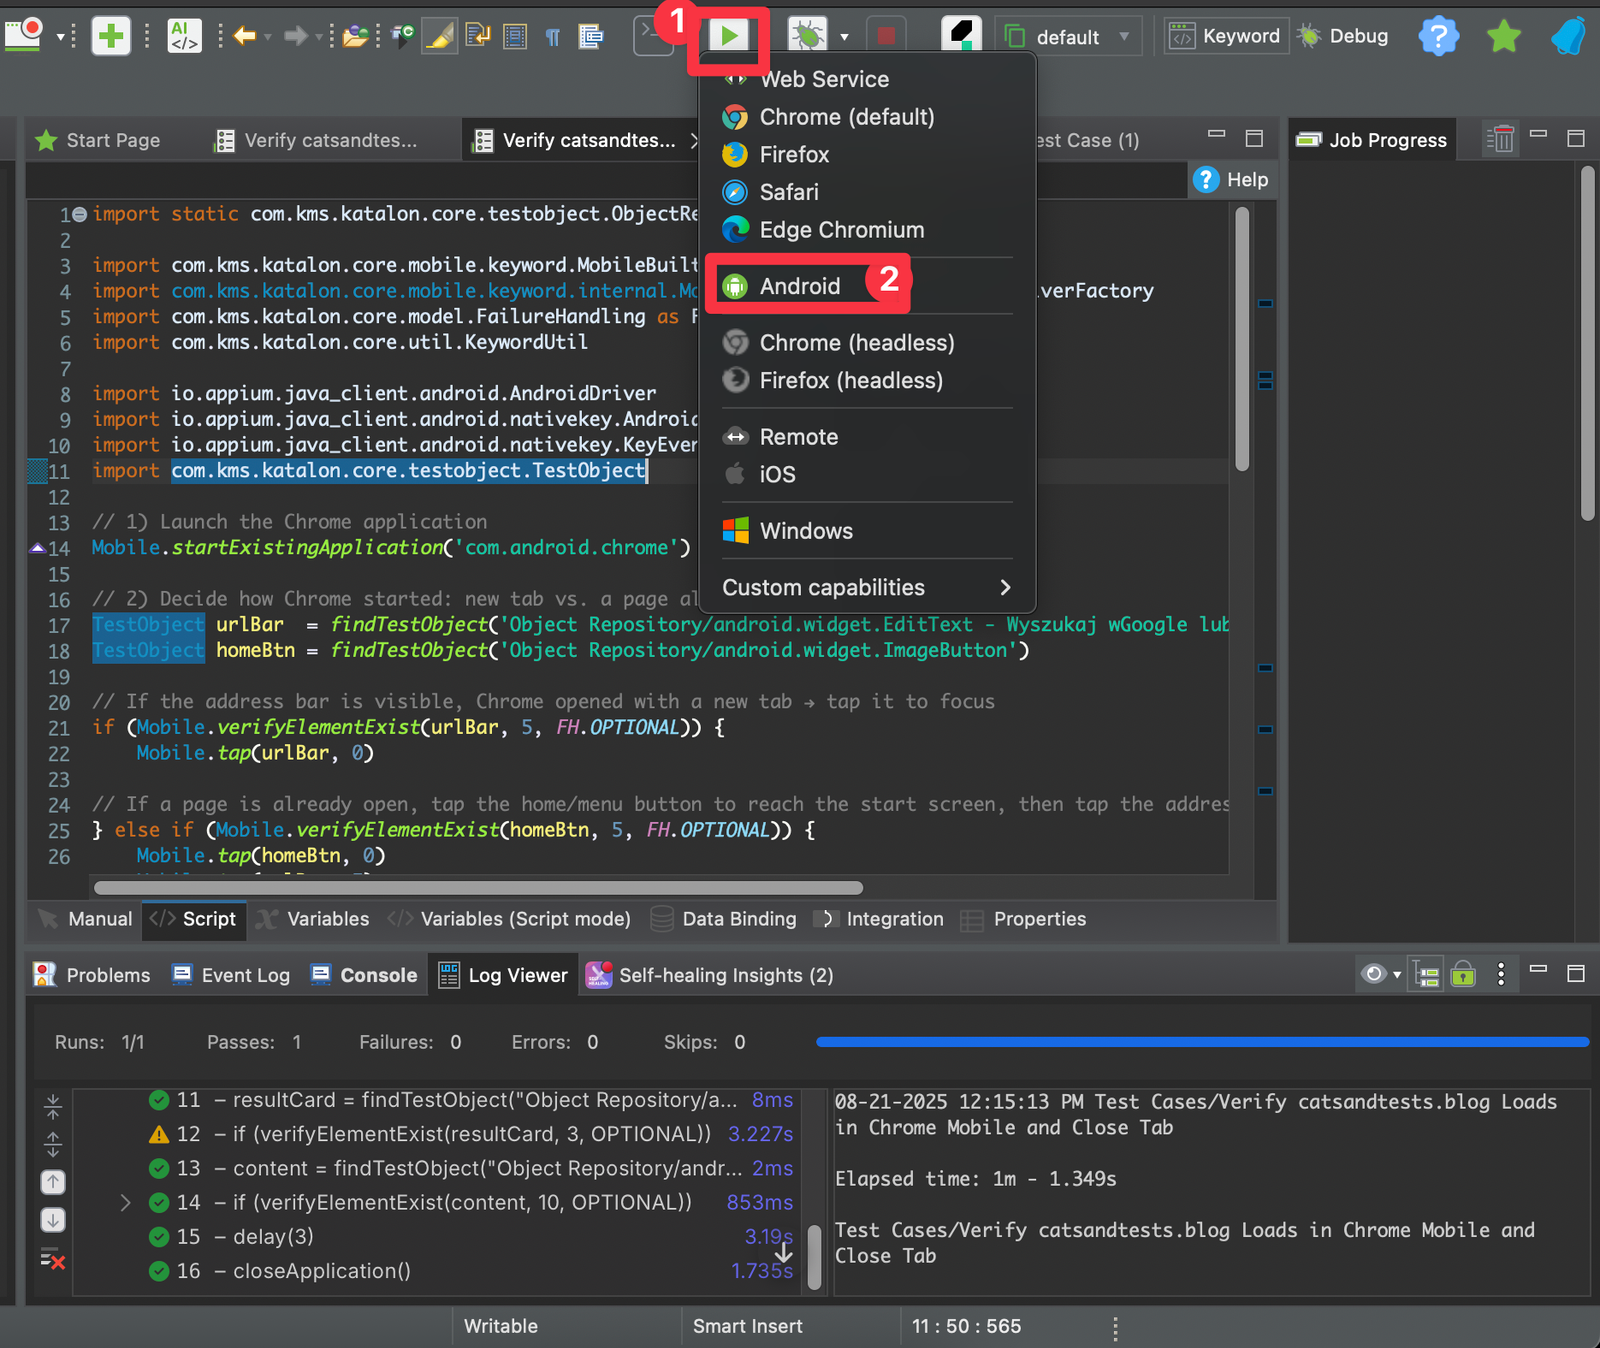
- In the toolbar, select Android as the execution target. Sometimes we need to select your device from a pop-up window.
- Watch the execution in real time and check the Log Viewer for results.
Troubleshooting tips
- Device not detected: run adb devices. If nothing shows up, check your USB cable, drivers, or make sure USB debugging is enabled in Developer Options.
- Unauthorized device: confirm the prompt on your phone to trust the computer.
- Port conflicts with Appium: restart Katalon or free up the default Appium port (4723).
- Slow test execution: try running on a real device instead of an emulator for better stability.
The challenges of mobile test automation
Writing automated tests for mobile applications is often more complex than doing the same for web apps. On the surface, both seem similar: you launch an app, interact with elements, and verify results. In practice, mobile automation comes with a unique set of challenges.
Locating elements is not always easy
In web testing, most elements have stable IDs or CSS selectors. On mobile, this is rarely the case. Developers sometimes forget to set unique identifiers, so testers are forced to rely on fragile strategies like XPath. These locators can break easily when the app layout changes or when running tests on different devices.
XPath and performance problems
While XPath can “rescue” you when no ID is available, it comes with a cost. On mobile devices, XPath queries are slower and less stable. They may even behave differently depending on the Android or iOS engine. This makes tests flaky and requires additional waits or retries.
Differences between Android and iOS
Mobile apps usually need to be tested on both Android and iOS. Even if the application looks the same, the underlying structure of elements can be very different. For example:
- The same button might have different locators or attributes in Android and iOS.
- Certain gestures (like back navigation or opening the app switcher) are handled differently.
- App permissions, system dialogs, and even keyboards appear in different ways.
As a result, one test script rarely works “out of the box” on both platforms. You often need to maintain separate locators or even separate flows.
Extra factors that affect automation
On mobile devices, the environment is more dynamic:
- System pop-ups like location requests or notification permissions can block the test.
- Network issues or slow performance have a bigger impact than in desktop web tests.
- Screen resolutions and aspect ratios can make some elements shift or resize.
Why web automation is easier
By comparison, writing automated tests for web apps is usually more straightforward:
- Selectors are more stable (IDs, classes, data attributes).
- The DOM structure is easier to analyze.
- There are fewer environment differences – a browser on Windows or macOS behaves much more consistently than Android vs iOS.
Tools like Selenium, Cypress, or Playwright also provide powerful APIs that make interaction with web elements fast and stable, while mobile frameworks like Appium or Katalon Mobile need extra handling for gestures, waits, and cross-platform compatibility.
Conclusion
Mobile test automation is powerful but comes with extra complexity. Locating elements, dealing with XPath, handling system pop-ups, and supporting both Android and iOS require more effort and creativity. That’s why many teams start with web automation first – it’s faster to build stable test suites and gives immediate value. Mobile automation pays off too, but it demands patience and good practices.
The purpose of this example is not only to show what Katalon Studio can do, but also to spark your curiosity. Every project and every tester has different needs, so I encourage you to explore Katalon on your own. Try its features, experiment with recording, scripting, and integrations, and see whether this tool brings value to your daily testing work.